
Disabling auto-update in the Google Play Store is an important feature for users who want to have more control over which apps are updated and when. Automatic updates can be convenient, ensuring that your apps are always up-to-date with the latest features and security patches.
However, these updates also consume data, cause unexpected changes in-app behavior, or even introduce bugs. By disabling auto-updates, you can review updates before installing them, manage your device’s storage and data usage more efficiently, and prevent unwanted changes to your apps. In this guide, we will walk you through the steps of disabling the auto updates in the Google Play Store.
How to Manage Auto Updates on Android™ 4.0 or higher
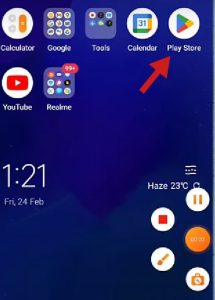
- From your Home screen, tap the Application screen icon.
- Find and tap Play Store.
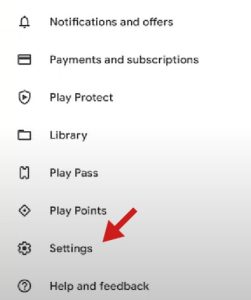
- Swipe from the left edge of the screen to the right, then tap Settings.
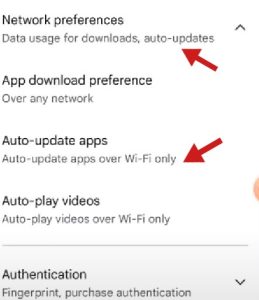
- Tap Network preferences → Auto-update apps and choose your preferred option. A dialog box will appear with three options:
- Over any network
- Over Wi-Fi only
- Don’t auto-update apps
- Select “Don’t auto-update apps” and tap “Done.”
.
How to Manage Auto Updates on Android 10 or higher
- Find and tap Settings → System → Advanced → Software update.
- Tap the menu button (three vertical dots) → Settings.
- Tap Auto-update apps and select your preferred option. A dialog box will appear with three options:
- Over any network
- Over Wi-Fi only
- Don’t auto-update apps
- Select “Don’t auto-update apps” and tap “Done.”
How to Manage Auto Updates Android 9
- Find and tap Settings → System → Advanced → Software update.
- Tap the menu button (three vertical dots) → Settings.
- Tap Auto-update apps and select your preferred option. A dialog box will appear with three options:
- Over any network
- Over Wi-Fi only
- Don’t auto-update apps
- Select “Don’t auto-update apps” and tap “Done.”

How to Manage Auto Updates Android 8.0
- Find and tap Settings → System → Software update.
- Tap the menu button (three vertical dots) → Settings.
- Tap Auto-update apps and select your preferred option. A dialog box will appear with three options:
- Over any network
- Over Wi-Fi only
- Don’t auto-update apps
- Select “Don’t auto-update apps” and tap “Done.”
How to Manage Auto Updates Android 7.0
- From your Home screen, tap the Application screen icon.
- Find and tap Settings → About phone/tablet → Software update.
- Tap the menu button (three vertical dots) → Settings.
- Tap Auto-update apps and select your preferred option. A dialog box will appear with three options:
- Over any network
- Over Wi-Fi only
- Don’t auto-update apps
- Select “Don’t auto-update apps” and tap “Done.”
ABOUT ME 🙂
As the lead content creator and SEO strategist at openplaystore.com, I, Elisabeth Morris Smith, am passionate about making technology accessible to all.
My role involves crafting detailed, user-friendly guides on navigating the Google Play Store, downloading apps, and installing APK files. I enjoy breaking down complex processes into easy-to-follow steps, ensuring users of all tech levels can benefit from our content.
If you need more information about my services, please no doubt in touch me: [email protected]